With NENP connectors the cleave makes the difference

No-epoxy/no-polish fiber-optic connectors require the installation technician to use care when cleaving the fiber, and also to check the cleave before termination.
TAKEN FROM THE CABLING INSTALLATION & MAINTENANCE ARCHIVES.
Problem
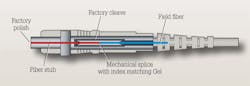
Fiber-optic connectors that require no epoxy and no polishing (no-epoxy/no-polish or NENP connectors) have grown in popularity and are widely used. Because the NENP connector is preloaded with a fiber stub that has been bonded and polished at the factory, it is sensitive to the quality of the cleave made to the fiber to be terminated. If proper installation procedures—particularly cleaving procedures—are not followed, these connectors may fail and be perceived as unreliable.
Solution
Take care when cleaving the bare fiber, and check the cleave before terminating the fiber.
Procedure
- Prepare the fiber-optic cable for termination as you normally would, by stripping away the outer jacket, buffer and cladding, and cutting away excess aramid yarn.
- Using a fiber cleaver, score the fiber with a single, light touch. Do not press the cleaver more than once, because doing so may make additional scores on the fiber and eventually cause it to break.
- Break the fiber by bending it together with the tongue of the cleaver.
- Examine the fiber with a microscope designed to inspect fiber cleaves. Ensure that the cleave is square and that there are no chips in the fiber. Some manufacturers’ toolkits include microscopes for this purpose.
- Using the measuring card that is included with the manufacturer’s toolkit, or using the scale on the cleaver, measure the bare fiber to ensure it is the proper length. If the bare fiber is too short, it will not reach the fiber inside the connector, and the connector will not work.
- Clean the fiber with an appropriate cleaning agent.
- Carefully insert the fiber stub into the connector until it meets the preloaded fiber stub.
- Using a crimping tool (which may be proprietary to the connector manufacturer), crimp the connector onto the buffer.
Test connectors periodically during the installation, rather than testing them all after the job is completed. Periodic testing eliminates the possibility of repeating the same errors throughout the installation.
Past CIM Articles