Correctly cleave a fiber in a ferrule
Barbara Birrell, 3M Telecom Systems Div.
Problem
The further a cleaved fiber extends out of the ferrule, the longer the polishing process and the greater the possibility of fiber breakage during polishing. If you cleave too close to the ferrule tip, a fiber chip may drop down into the ferrule, which you cannot remove in the polishing procedure.
Solution
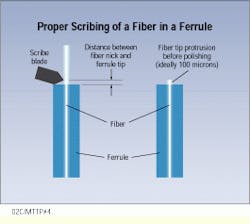
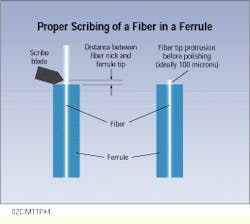
The shape and depth of the nick, and the size, direction, and distribution of the applied stress determine the shape of the cleaved surface. When cleaving a connector assembly, the nick should occur just above the ferrule, so that the tip protrudes 100 microns above the ferrule before polishing; that is, about the same length as the fiber is wide.
Procedure
First, some general comments about cleaving, which is the process of breaking the fiber with a planar endface on the fiber tip.
- Cleaving involves introducing a nick on the glass fiber, then stressing the nick, causing it to break the fiber.
- If you use a scribe to introduce a nick on the fiber, you must then apply tension by pulling on the fiber to break it. How-ever, when you use a cleaver, it not only introduces a nick on the fiber, but also applies tension with a mechanical device.
The quality of the cleaving tool is the next consideration.
- Blade materials are generally diamond and tungsten carbide. Diamond, which is more durable but also more expensive, has little or no wear over the life of the cleaver.
- Any type of blade should be covered when not in use, to prevent damage.
- Blades are available in conical and wedge shapes. The wedge-shaped blades may be easier to use, but that is a personal preference.
Now, you`re ready to cleave the fiber in a ferrule.
1) Using the ferrule as a guide, bring the scribe in at an angle almost parallel to the ferrule surface.
2) Very gently scribe (nick) the fiber near the tip of the ferrule. Make the nick so that the size of the protruding fiber before polishing is about 100 microns.
3) Do not use excessive pressure when nicking, as it will crush the fiber and produce a shattered cleave. This results in a high-loss component because it will scatter the light transmission.
4) Break the fiber with a gentle axial tug.
Observe the assembly from the side. Does the fiber tip extend above the ferrule by a distance approximately equal to the width of the fiber? If so, you are ready to proceed with the polishing steps.
Ideally, make the fiber nick with the cleaving tool so that the fiber tip protrudes approximately 100 microns--about the same length as the fiber is wide--before polishing.
Barbara Birrell is a senior physicist with 3M Telecom Systems Div. (Austin, TX).

