Blog: Clean your fusion splicer like you brush your teeth
By DAVE SCHUMAN, America Ilsintech -- We’ve all gone to the dentist for a cleaning and been given the sage advice: Floss and brush your teeth (most say twice a day!) to avoid the buildup of plaque and germs that can be harmful to your teeth and even your health. Keep your teeth clean, and they will serve you well for a lifetime!
Believe it or not, the same advice applies to fusion splicers (F/S). Fusion splicing as a craft is much easier today than 20 years ago when it was more of a specialized skill. Technology has evolved, and fusion splicing is now a critical component of any jobsite, coal mine, data center, etc. Fiber is no longer limited by geography. Now anywhere you go can have fiber.
Fiber optic technicians rely heavily on their fusion splicers and expect them to perform consistently every day. If the splicer malfunctions or breaks, the technician loses a full day of productivity. How can you avoid these costly and frustrating issues? By cleaning and maintaining your fusion splicer daily to ensure tomorrow will be as successful as today.
When I meet technicians and see their machines, oftentimes, it is an indicator of the type of technician they are (although some receive second-hand or borrowed machines). Cleaning a fusion splicer every day takes about the same amount of time as flossing your teeth, 3-5 minutes or less.
If you don’t clean your machine daily, debris will build up in certain areas and negatively affect the machine’s performance. The most common answer I get from a tech when asked how often they clean their machine is: “I try to clean it every day, but it’s been a couple of weeks.”
If you clean your fusion splicer every day, you remove 95-99% of dust, debris and fiber shards from the machine. Compare that to if you clean it every week, you only remove 90-95%, and the buildup has already begun.
Initially, you might notice that post-splice estimated loss readings are beginning to increase or become inconsistent. Still, if you never (or rarely) clean your splicer, within 3-5 months, you’ll start experiencing noticeable issues with alignments, cleaving and even fusing.
Daily Cleaning - Let’s review the causes and effects of bad splicer hygiene and how to combat them by cleaning your machine daily.
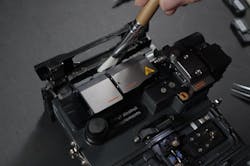
- Environmental Dust – Dust is most prevalent in outdoor applications like fiber to the home, coal mining, refineries, and large indoor spaces like data centers with constant ventilation and moving the air. Once you take your (F/S) out of its case, wind, airborne particles, and dust will coat the exposed parts and get into the fusion chamber and cleaver during use. If it is a windy day, the splicer will be coated in a layer of fine dust that impedes areas that operate best when perfectly clean. Taking a few minutes at the end of the day to brush the whole machine, as well as your cleaver (whether you have a stand-alone or an All-In-One), will alleviate this buildup.
- Fiber Chards and Fiber Jacket Debris – Depending on where your cleaver is located, fiber chards and outer jacket coatings can blow, fall or get transferred into or onto the F/S. These need to be safely and quickly removed with tweezers as they can get caught up on the alignment system, fusion chamber or sleeve heater oven. Once lodged in these areas, debris can be challenging to locate with the naked eye, and heat from the fusion chamber or heater can melt the debris onto the F/S, making it difficult to remove and increasing build-up over time.

- Thermal Stripper – If you have a Swift All-In-One unit, it has a built-in thermal stripper. Open the doors with the stripper OFF and brush the underside of the doors. Be sure to brush all the metal and rubber pads as well as bottom surfaces. Next, turn on the thermal stripper and be sure NOT to let the brush hit the heated surface as it will melt debris from the brush bristles back onto the heater plate. Close the stripper doors and use the brush and or tweezers to remove any jacket debris and dust from the opening, making sure it is clean. Turn the stripper back on and then off as this area is now completed.
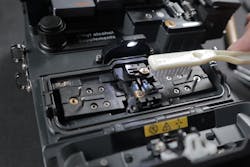
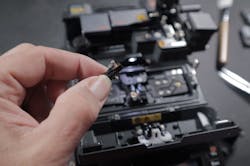
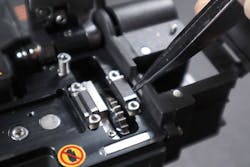
- Fusion Chamber – Under the wind cover is the area called the fusion chamber - where the magic happens. Two pieces of hollow glass are melted together, preserving the hole so light can pass through it. In the fusion chamber, there are “V-Grooves” where the fiber ends rest between two electrodes (the conical, pointy metal parts) that send a high-power electrical charge around the glass to fuse it together. When a fiber or connector is placed into the fusion chamber, it has been cleaned with a fiber wipe and fiber cleaner, then cleaved and put directly into the chamber to rest on the V-Groove. Even though it has been cleaned, the fiber can easily carry dust or debris into the chamber just like the wind can.
Fortunately, most quality F/S have a solution for this called a flash burn or cleaning burn. When you close the wind cover, a short, lower voltage discharge automatically initiates to burn off any remaining debris, lint, hair or whatever might be on the fiber. That’s the good news! Now the bad news. Matter cannot be created nor destroyed. The flash burn creates very fine (in size, not in appearance) debris that falls into the V-grooves, fusion chamber floor and possibly onto the camera lenses. Missed cleanings will result in a debris buildup in the most sensitive areas of the F/S. The fusion chamber needs a good brush down at the end of each day, with some technicians brushing multiple times a day. If you don’t get the V-Grooves clean each time you perform a splice, both the cleaning burn and actual fuse burn will start to bake debris into the V-Groove, making it more difficult to remove. Over time, this will cause a higher estimated loss for your splice results, and since most V-Grooves are made of ceramic, you cannot scrape or scratch them. Your dirty machine will need maintenance and professional cleaning.
- Sleeve Heater Oven – Be sure the oven is completely cooled before attempting to clean. Open the heater door and brush it out well. If debris is stuck on the base of the heater, use the back of the brush or a tweezer to delicately remove it without scratching or damaging the surface.

Cleaver – Good cleave angles are the gateway to successful splicing results, and a well-maintained, clean cleaver is tantamount to success. If you have a chip bin, you should empty it daily, making sure to safely discard the shards so they cannot harm anyone handling the trash. Currently, there are two types of cleavers, they can be built on board like our All-In-One or can be independent units.
- Fixed blade cleavers use the same spot on the blade to cut the fiber until the technician manually moves the blade. Typically, (barring damage) each of the 16 positions is good for 2-3,000 cleaves before it needs rotation.
- Rotating blade cleavers have up to 25 positions that move after each cleave and require no user intervention for 75,000 cleaves.
Most F/S display the cleave angle before splicing. The technician has to monitor a steady rise in cleave angles for fixed blade units and move the blade when they are consistently high. Rotating blade cleavers should be fine for many years unless there is damage to the blade which cannot be fixed. Cleaning a cleaver is achieved by first inspecting it and removing any fiber chards or jacket debris with tweezers and then emptying the chip bin (if one is present), followed by brushing the unit all over. DO NOT LET ANY DEBRIS FALL IN AND AROUND THE BLADE. OVER TIME THIS COULD AFFECT THE OPERATION OF THE CLEAVER MECHANISM! If the cleaver is not attached to the F/S, you can use compressed air to clean out any debris over a trash bin with eye protection.
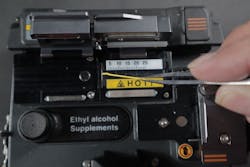
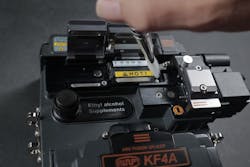
Weekly/Bimonthly Cleaning – If you are keeping up with daily cleaning, every week or two, you should do a more in-depth cleaning that incorporates other areas of the splicer. This will require some fiber cleaning solution (99.99% alcohol only or an approved fiber optic cleaner).
- Perform A Very Thorough Daily Cleaning – Perform your daily clean but be very thorough and inspect all surfaces well. Make sure to get around the dust channel of the wind cover built into the splicer body and any other areas that you might not clean daily.
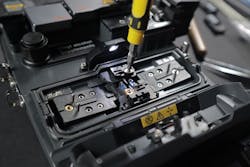
- Wipe Down – This step requires some restraint as “dryer is better and wetter is not good.” Wet a fiber wipe with enough fiber cleaner or 99.99% alcohol enough to make it damp. When you wipe a surface, it SHOULD NOT LEAVE any moisture on the surface. Make sure the heater and thermal stripper are off and cool. Wipe down all the surfaces that you typically brush when you daily clean. Pay extra attention to the rubber pads that hold the fiber in the thermal stripper and cleaver. Next, in the fusion chamber, take a fresh damp wipe and clean the V-Grooves. Having a jewelers loupe will assist you in seeing what debris is on the V-Grooves as they are often smaller than a grain of sand. Apply pressure as you clean the V-Grooves as debris will bake onto them if not removed regularly. Take another damp wipe and clean the remaining surfaces under the wind cover EXCEPT FOR THE ELECTRODES.
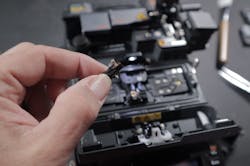
- Electrode Cleaning – Remove the electrodes. Usually, a screwdriver is needed but DO NOT TOUCH THE METAL ELECTRODE itself as it will transfer body oil which could affect their performance. Take them out and clean them well with a damp wipe, and set them aside, making sure to put them back into the exact location after cleaning the cameras (below).

- Camera Cleaning – You will need electronic lint-free swabs for this task. Once the electrodes are removed, you can look into the area underneath to locate the camera lenses. Use only lint-free dry swabs in a circular motion to clean the lens surface. Replace the electrodes once the lens is clean, making sure NOT TO TOUCH the metal surface of the electrodes.
- Arc Calibration – An arc calibration should be performed when there are changes in altitude, temperature or humidity. The F/S has sensors that regulate the arc sent to the electrodes based on environmental conditions. When you remove the electrodes, you should also perform an arc calibration to ensure that the F/S is working properly, as an arc calibration will test all the system components. ALWAYS USE SINGLE MODE fiber for an arc calibration.
- Clean Out Your Hardcase – If you keep gear or supplies beyond what originally came with your F/S, you should occasionally empty your hardcase and clean it with a multipurpose cleaner to remove dust or debris that can transfer to the F/S or cleaver.
Warranty Non/Warranty Maintenance – All America Ilsintech fusion splicers come with a 36-month warranty that includes two maintenance/software upgrade visits at no charge. These are valued at more than $300 each by some of our competitors. You can call America Ilsintech to get an RMA#, and we will, at no charge, deep clean your fusion splicer, upgrade the software and address any minor issues. If more involved problems are discovered, we will prepare an estimate for any repairs that are not covered by the warranty. Items not covered by the warranty are typically physical damage or repair damage due to user error.
Happy cleaning and be on the lookout for a future article on stripping and cleaning fiber and connectors.
DAVE SCHUMAN is VP of Service Provider Markets, USA and Canada at America Ilsintech.